Last night I tried some sanding on the chip tray and was having problems with sanding through the paint, so I fixed those spots and shot on a few more coats of clear. This really smoothed the surface out and I was able to wet sand it to 1500 grit today just fine. I also did the rubbing compound, but was too tired to move to the polish. You can see it's starting to shine a bit.
I also clean up those bed ports that messed up and shot on some more paint. Hopefully I can finish the bed painting in the next few days. Then, I can start putting the thing back together in the basement. There will be lots of work from there. I'm going to get the bed in place, then move on to the saddle and apron, then the headstock. One thing at a time.
Saturday, July 25, 2009
Friday, July 24, 2009
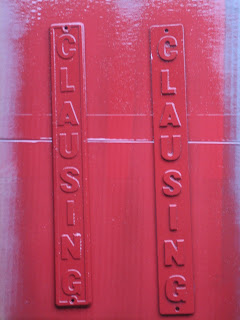
Amidst spending the day trying to get doors to open and close in a virtual world, I took some time out to work on the lathe bed and badges. Sanding with 80 grit wet sandpaper brings the Clausing name to light very well. I still need to do a bit more. The newer badge I bought was a big rough in places and needed to be sanded down to get all of the edges really crisp. I'm close, but still need to sand some more. Once I'm happy with them, I'll give them a coat of the Rustoleum Crystal Clear to protect them.
The lathe bed and risers have been painted. The risers turned out great, as did most of the bed, but the paint blistered inside each of the four ports. I have no idea why. I sanded them down and put a coat of Almond on them today and will have to wait a couple days to try again on the final coat after some more wet sanding. I think I may have tried to put the paint on a bit too thick in the ports since you end up shooting from the top and the bottom. Hardest part is trying to avoid messing up the paint I'm really happy with. You can see the towel I put in the bed to keep overspray off the top of it.
Friday, July 17, 2009
Clausing badge
These are the two Clausing labels for the headstock pedestal. The one on the right came with the lathe. The one of the left I bought on eBay for about $10. It's from a later 5914 and I think the casting is much nicer so I'm going to use it, but I decided to paint both since I may find a use for the other one somewhere. The paint is Rust-Oleum Cherry Red, which I think is a pretty close match to the red that was on the left label which I think was original. The label that came with the lathe had been painted over long ago.
I picked up a Royal 5C collet closer on eBay and it arrived yesterday. It's not exactly for this lathe, so the tube is long and it was missing what Royal calls a rear end spindle adapter, which is custom for a particular lathe model, anyway. But, as it turns out the lathe came with that particular part. It was one of those mystery parts that I could not see a purpose for before. I'll just cut the tube to length when the lathe is back running again.
Mucho painting...
UPS hath delivered and I am stocked back up on paint. I did a quick smooth sanding of the risers and the bed and shot on a couple coats of new primer and several coats of the almond. At last the bed is the right color. In a couple days I can wet sand and add another coat and the clear and maybe by next weekend be able to put the pedestals, chip tray, risers, and bed all together in the basement. It will finally start to look like a lathe again after all of this time. I won't be immediately assembling. I do need to reinstall the gear rack and the label first, but that won't take too much time.
I included 50 sheets of 320 grit sandpaper in this last order. I used to always buy sandpaper at Home Depot, but for the price of about 3 of those five sheet packages, I can order in 50 sheets and then you don't feel like you're about to run out of sandpaper all of the time. This project has really restocked my sandpaper collection. I like Enco for waterproof paper, but buy the courser paper from Auto Body Toolmart instead. The quality of the Mirka paper is so much better than any I've found elsewhere and is expecially better than the stuff you buy at Home Depot.
Wednesday, July 15, 2009
Sanded the riser
Not had a lot of time to work on the project lately, but did get to the garage tonight to do some sanding on the riser so it's ready to move on to the color paint. I'm out of paint, so I placed an Enco order tonight as well. I'm glad I procrastinated the order. I just got an email with codes for free shipping and 10% off. And, Enco is always very fast, so I expect the paint and some other misc items Friday. More pictures this weekend for sure.
Friday, July 10, 2009
Working on the risers
The risers are two cast iron pieces that go between the pedestals and the bed. The tailstock riser was one of the first pieces I worked on. The headstock riser is a bit more complicated, so I had been putting it off. But, the bed is just about ready for paint and these will be the last major item needed to put together the bed, chip pan, and pedestals in the basement. It will finally start to look like a lathe, again. The risers were a bit tough to work with, especially the one on the headstock end. Since they were rough castings, I wanted to smooth them out, but body filler would not stick very well. I did many passes of filling in the top, then having the filler flake back up. The Clausing group on Yahoo suggested that these tend to soak up oil over time and it was suggested that I hit it with a torch. I'm not that keen on hitting anything with a torch, but I did have good luck scrubbing with lacquer thinner until a paper towel did not get dirty. This seems to get the oil out so the filler sticks pretty well.
The bed is just about ready for paint. After a priming, I found a couple spots I was not happy with and spend some time tonight smoothing them out and applied more primer. After another day or so, it will be ready for a quick sanding and the final paint color.
Picked up a Royal 5C lever action collet closer on eBay for $52. I'm surprised it found it so cheap. Sent and email to Royal and they promptly sent me a manual for it as well.
Saturday, July 4, 2009
Bed getting closer
I was away from the project for a while due to work, but spent some time the past few days on the lathe bed. I sprayed a guide coat over the primer and let that sit for a day, then sanded all of it off. It's a good way to ensure the entire surface is smooth. Then I put a new coat of primer. You can see how shiny even the primer is in the ports, now. Lots of body filler and sanding and the surface is very smooth now and ready to proceed to the final paint coat.
I've picked up a Cushman 8" 4-jaw chuck and L-00 spindle protector on eBay. The Chuck is very nice; looks like it's hardly been used and I paid less than I would for a backing plate alone. I also bought a 5C collet adapter for a 5418 lathe. The main reason to buy that was to get the elusive 4 1/2MT to 5C collet adapter. I also have a thread protector that does not fit and a closer that is a bit short. I can extend the closer and found the right thread protector in another auction. What is interesting to me is that I paid less than half the price for the adapter and other items as someone else just paid for just hte adapter. eBay can be a bit nuts at time. I also bought a Clausing nameplate. I have the one the lathe came with, but this is a bit later generation and I think the casting is nicer, so I'm going to swap it in. The price wasn't very high and I was the only bidder.
Subscribe to:
Posts (Atom)