As you can tell by the dates, it's been a heavy semester and I've had very little time to work on the lathe project. About the only thing I managed to do was create a place for my new surface plate and finally get it out of the kitchen. I had this roll around cart which is pretty heavy duty and the same size as the plate. However, it was a bit low to use. So, I built a wood drawer unit where I can put tools related to the plate. It turned out very nice, I think. I also had some drawer slides from a previous project and made a shelf underneath that pulls out. I put the Enco 12x18 plate on it. I figure I might sometimes want to use it for measuring, especially if the top plate is significantly blued. My old plate is on the bottom, so this unit weights close to 400 pounds, now. But, it's pretty stable when working on it.
I found the 12x18 very restrictive when spotting, so I'm hoping to get back to scraping pretty soon and see how much better I like this larger plate. I'm very proud to get such a high quality plate for such a small amount of money and, as far as I can tell, it's in perfect condition. I love quality tools.
Saturday, November 21, 2009
Monday, October 26, 2009
New surface plate
After working on scraping for a while, I figured out that I would much prefer a bit larger surface plate. I figured an 18" x 24" would be about perfect. They are not that expensive at Enco, but they cost more to ship than to buy, since they weigh close to 200 pounds. So, I created a search on Ebay for surface plated within a reasonable driving distance and in no time at all a Starrett Crystal Pink 18x24 showed up in a small town just south of here and I picked it up for $88. As far as I can tell, it's in perfect shape and even includes the hard plastic cover. I used the hoist to get it out of the truck, then managed to get it up the few steps and into the kitchen, and that's where it remains, next to the pantry on a furniture platform. Now all I have to do is figure out how to get it downstairs to the basement.
I've had next to no time to work on anything lately. Work has just consumed every minute. I spent a little while last weekend and managed to do some more scraping on the cross slide top, which is close to right. Then I'll move on to the dovetails again. I still can't seem to get the scraper to cut as cleanly as I would like, even though I am used all diamond sharpeners. But, it does get it incredibly flat, just maybe not as pretty as I would like. Actually, the only scraped area that may show is the top of the cross slide and I'll likely paint that, anyway, leaving only the area under the compound unpainted.
Sunday, October 18, 2009
On its own four feet
Alas, I've been working so much I've had little time to spend on the lathe project. I did spend some time putting up new shelves and cleaning a bit in the shop and I have been moving more and more of the parts downstairs into the basement, but I've not done much actual work on the machine. So, I took some time today and put the remaining two feet on and leveled the bed.
I really love high quality tools. One of my prize possessions is a Moore and Wright engineer's level I managed to pick up at a local auction a few years ago for $35. The graduations work out to about 0.003 per foot and you can read much less than the graduations, so I figure I can reliably level to less than 0.001 per foot. I did have to spend some time aligning it. There are adjustments and you get it so it is level whichever way to point it. I was then able to get the aligned to a good deal of accuracy. Small changes in the leveling adjustments were clearly visible on the level.
I'm a long way from a real assessment of the status of the bed, but moving the level around I could not see any deviation from level when end to end and cross ways there was only about 0.001" that I found in the heavily used area near the headstock. Otherwise, it's all on the mark. I'm pretty confident that it's in good shape. Now, I was basing this on the flats. I'll try it with the apron sometime soon, though I think I need to do an undercut on the apron first.
I really love high quality tools. One of my prize possessions is a Moore and Wright engineer's level I managed to pick up at a local auction a few years ago for $35. The graduations work out to about 0.003 per foot and you can read much less than the graduations, so I figure I can reliably level to less than 0.001 per foot. I did have to spend some time aligning it. There are adjustments and you get it so it is level whichever way to point it. I was then able to get the aligned to a good deal of accuracy. Small changes in the leveling adjustments were clearly visible on the level.
I'm a long way from a real assessment of the status of the bed, but moving the level around I could not see any deviation from level when end to end and cross ways there was only about 0.001" that I found in the heavily used area near the headstock. Otherwise, it's all on the mark. I'm pretty confident that it's in good shape. Now, I was basing this on the flats. I'll try it with the apron sometime soon, though I think I need to do an undercut on the apron first.
Thursday, October 1, 2009
No time lately...
I've been positively swamped with work lately, so there's been no time for the lathe project. I did finally break down and order the Conelly book "Machine Tool Reconditioning". I keep hearing people talk about how hard this book is to get, but I just ordered it from Amazon.com marketplace and it came right in.
To the left is a real "made in England" hand scraper. It's a small one that I picked up very cheaply on eBay. There have been more of them since as well. I wanted to compare high-speed steel scraping to the carbide I have been doing. Just playing with it, it needs to be reshaped, since the curve it came with and the angle of the tip and very aggressive. I did some sharpening and it's looking like it does a nice job. It does get dull pretty quickly, though, as expected.
Below is my 18x24 surface place. Actually, it the new plate on the right and the one that arrived broken on the left. I put them both on a perfectly sized stand I picked up at a school auction for $1. I use the broken one for spotting and the good one for measuring. That way I'll never get any blue on the good one. That stuff does not come off very easily. I don't think it really matters to the function of the plate, though. I really want a single 18x24 surface plate. They are pretty cheap to buy, but the shipping costs more than the plate. I figure I'll keep an eye out for someone selling one here in Michigan, where machine tools are somewhat of a glut and I can just pick it up. Then I have to get it to the basement (it's close to 200 pounds).
Sunday, September 20, 2009
Scraping moves to the saddle
I spent the entire evening scraping. I'm satisfied that the bottom of the cross slide is done. It has a large number of evenly distributed bearing points and looks very nice. So, I spent some time on the top of the cross slide. It was somewhat rough and I figured it should be as flat as possible. I read one person online who had his ground, but several people said that can cause them to warp, ruining my scraping job on the bottom and I didn't really want to have to take it somewhere and pay to get something so small done. So, I figured I might as well scrape it. I started with a file to get the really high spots down, then worked it until I kinda got tired of working on it. It's flat over most of the surface and that entire area measures within 0.0005" relative to the bottom of the slide. I didn't really have to do much to make it level other than scrape down one corner a bit harder. It's not all of the way to the corners, though, so I'll have to spend some more time later. It appears to have bowed up just a little bit with time.
I was ready to try something else, so I launched into the saddle, using the cross slide as a reference. The picture above is after about four passes. The gib side had a ridge on the inside as would be expected and I've about got that down. It's clearly more worn toward the far end than near the apron end, again as would be expected. I really don't think this scraping is going to take too long to get done, given the progress I make already. In general, this machine was not that badly worn when I got it.
I spent quite a bit of time grinding the scraper bit. The large flat surfaces on the bottom and top of the cross slide were easy, but now I'm having to get into dovetails, so I ground the sides and front back so it's more like a chisel. That seems to work pretty well. I don't think I'm scratching the dovetail side very much and I'll be back to scratch it a bunch later on, anyway.
The plan is to get the saddle bottom flat, then use the scraping plate I bought to get the saddle dovetails flat and parallel. Then I'll use that as a template for the cross slide dovetail and the tapered gib.
Thursday, September 17, 2009
eBay purchases
eBay continues to be a great source for this project. My lathe was missing the threading chart. It doesn't effect the functionality at all, but it's just an annoyance. Well, tonight I picked one up on eBay for $12. I also got a set of half-nuts. They are used, but that does avoid me having to try to make some. I was surprised to get them for just over $40. I heard the last set to go on eBay went for more than $100. Guess there's not as many people buying right now.
I've not had time to get back to the scraping project. It was getting close, but I take a small amount off at a time, so it goes pretty slow. I'll probably get the bottom done this weekend sometime, then move to the next part.
Wednesday, September 16, 2009
Scraping on the cross slide
I launched into the scraping project tonight on the cross slide bottom. It definitely had quite a bit of wear on it. I should have taken pictures when I started of the blue in only a small section of one side and in the middle of the other. After about a zillion passes, it's all pretty flat, but I will have to do more passes to get the bearing points distributed nicely. It got late and I had to quit for the night. This picture has some blue on it so you can see some of the spots. I'm having trouble getting the blue to transfer brightly. Instead it looks very light and is hard to see. I'm going to have to get a good fluorescent light to work on this more.
Saturday, September 12, 2009
Attaching the bed
The bed and the pedestals are now attached! I figure the bed and risers is just over 200 pounds. I made a simple cantilever lift from 2x6's so I could easily set the bed down on the pedestals with little effort. That hydraulic table is one of the handiest things I've ever purchased. Anyway, it's at home now. I attached the foot bracket on the other end, but I need to get a couple bolts to put on the other two feet. Then I can look at leveling in place.
I cut two pieces of wood that go between the bed and the chip tray. With them in place I can slide the lift table under the whole thing and lift it right up to move around. Works just fine.
I intentionally filed the scraping experiment so I could do it again, getting more practice. I'm getting better, I think. You can't really mess things up very quickly, since the process removes so little material at a time. I picked up an ink roller and that made all of the difference in the world on getting good transfers to the high spots. I may be confident enough pretty soon to look at that cross slide. I found a set of scraping plates including one flat and one 60 degree on eBay and got the set on a Make Offer. I had been concerned about how to make the 60 degree reference I would need and this solved that problem quite handily. These were supposed to have been made in 1954, which makes them five years older than I am. But, good tools should last longer than we do.
Monday, September 7, 2009
The first scraping experiment
I had an old 9x20 lathe part sitting around, so I'm using it as a scraping experiment. This is the first attempt. I don't have the geometry of the scraper tip quite right, yet. I really wish I had a diamond wheel to grind with. Instead, I'm working it by hand using a diamond hone. It's hard to keep it from being a convex end that way and the middle is hard to get has sharp as the sides for some reason. It's very sharp, though. I don't need much pressure to scrape this cast iron at all. It's very flat now, but has some gouges. I'll work on the scraper a bit and then try again. I may even mess it up a bit first.
I'm also having trouble getting bright transfers from the surface plate. I'm going to pick up a roller tomorrow. Most of the advise I've seen said to roll the ink out. I tried spreading with a rag and by hand and it's hard to get it thick enough to mark, but not so thick it marks everything. I can get it thin enough, but it's hard to see the markings sometimes.
It looks nicer in person than in the picture. The picture shows every flaw. But, it looks almost like real hand scraping.
Saturday, September 5, 2009
Starting the scraping project
I'm starting in on the scraping project. I'm making my own carbide scraper from 1/2" drill rod. I milled a slot in the end for a carbide blank and hold it in with two 6-32 set screws. It's done and seems to hold very tight. I started grinding the carbide a bit on the grinder, then fine tuned it with diamond laps. I still need to put more curve into it, but I do have an initial edge.
I couldn't resist trying it. Enco sent me another surface plate and this one arrived okay. I have a 9x20 lathe compound part that I'm going to experiment with. I put some Dykem high spot blue on the surface plate and then the part. The high spots were very clear and I was able to make good progress in a few passes on getting them to spread out a bit. Of course, I don't have a good way to hold the part yet and need to put a handle on the scraper, but a quick try seems to indicate it works pretty good. I was definately able to scrape very tiny shavings where I needed to. But, I'm going to spend quite a bit of time practicing before I start scraping real lathe parts.
Monday, August 31, 2009
I received Enco and MSC orders today. I was out of clear paint and needed some rubber to make the tailstock pedestal gasket and a few other smaller items. And, I'm setting up to try scraping so I can get the cross slide and compound really up to spec. I ordered a nice new surface plate from Enco. I have one I got at an auction, but it's old and a bit worn and I was able to detect about 0.001" or localized error. So, I ordered a new one for $36.95. As you can see, it arrived with a corner broken off. I called Enco and they are sending a new one tomorrow and told me to just toss this one. Seems like it's still a usable surface plate, though I don't know why I'll ever need three surface plates.
The new plate is 3" thick. The older one I bought at an auction is 4" thick (it's under the one in the picture, BTW). It would be nice if I could get that one back up to spec, but it's bound to cost more than a new surface plate does.
I'm wondering how this 70 pound block of granite can be precision made in China, shipped across the ocean, warehoused, and then shipped to me (for free no less) for all of $36.95. The shipping to me must cost about that much alone. I figure Enco counts on the good will they get by selling items like this at a loss or something. This is the first time I've had a problem with something ordered from Enco and they could not have been nicer or more efficient in dealing with it.
Sunday, August 30, 2009
Cross slide
I took the entire cross slide assembly apart today and worked on cleaning it up. Someone apparently crashed it into the chuck or some work at one time, so there is some gouging on the headstock side. This won't effect functionality, but I will try to figure out a way to make it look nicer. Other than that, the parts all cleaned up very nicely.
After discussing it online, I'm setting up for scraping and will look at scraping the cross slide dovetails, though I'll likely spend a lot of time on practice before launching into something real. It should be possible to restore the functionality to original condition with scraping. I ordered a new surface plate and other things to attack that project starting next week.
Sunday, August 23, 2009
Saddle
I started work on the saddle today. I have most of the paint stripped off. I pulled the oilers. I didn't want to have to mask around them and, besides, the oil channels need a good cleaning, anyway. They are 5/16" diameter press fit and MSC Industrial has them for $0.87 each, so I figure it's worth it just to have some that look new, anyway.
I'm saving up a list to order, so I went ahead and started in on the saddle even though I've not placed the bed on the pedestals, yet. I figure the saddle will need some parts as well. The casting is rough in places and will need to be smoothed out. I'm probably not going to worry about lapping until I get it on the lathe.
Thursday, August 13, 2009
Rack and risers
It was very messy, but the rack cleaned up nicely and has been mounted. I hit the screw heads with a polishing wheel and it all looks brand new. I then mounted the risers and the bed is complete and ready to drop onto the pedestals. This picture also shows the name plate in place.
I spent quite a bit of time with a Scotch-brite pad and WD-40 polishing up the bare metal and ways on the bed. They all came out very clean. It's an older machine, so there are lots of nicks on the top of the ways and inside corners, but all bearing surfaces, the ones that really count, are very smooth and clean. There was a bit of rust, but it was all surface rust and did not pit or anything.
The next adventure is going to be getting the bed onto the pedestals. I need to make an Enco order first, though, to get some new rubber to replace the tailstock riser gasket. I can make one as nice as the original one.
Tuesday, August 11, 2009
Restoring it's identity
While I had the bed on the hydraulic table, I rolled it under the drill press and mounted the name plate. I cleaned it up the best I could, and it looks pretty nice, nicer than the picture on this blog. I'll likely update that picture at some point.
I drilled and tapped two 6-32 holes. The nameplate was originally mounted with rivets, which I had to grind off to remove it. There was also an inventory tag I discarded. I figure screws will look nicer and make it easier to remove should I want to do so.
Note the neat crossed lasers on the drill press. They are not always perfect and I need to adjust them a bit more, but they really made it easy to get this heavy bed and table lined up under the drill press head. Then I could drill and tap without worrying about breaking a tap off in the hole. I'm not power-tapping, BTW. There's a spring-loaded tap guide in the drill chuck that keeps the tap centered.
A new home
Neil and I moved the lathe bed to the basement tonight. It's sitting next to the base right now on the hydraulic lift table. Next projects include mounting the name plate, shining up the metal, and mounting other items such as the rack and risers. Then I'll figure out a way to drop it onto the bed and screw this all together again.
That hydraulic lift table is one of the best purchases I have made recently. I mainly got it to lift projects I'm working on so I don't have to lift them always by hand, and that has been very useful in this project. It's a 1000lb table, so I can actually lift the whole lathe and move it with it later on, though I'll have to make something to lift it by the bed, not the chip tray. Future project.
Sunday, August 2, 2009
Starting to take form in the basement
Today I spent some time doing the final polish on the bed and risers and hauled them downstairs. The rubber gasket on the headstock end of the bed took quite a while to clean. It was coated with that hard grease the machine was covered with when I bought it. It took lacquer thinner to cut it, but it looks pretty good when cleaned up and is a pretty tight seal for being so old. The other rubber gasket on the tailstock end is not in very good shape, so I'll try to find some 1/16" rubber to make a new one to replace it with. It's hard to see the shine in the picture, but you can really see the lights reflecting off the tailstock pedestal and riser in the picture. I'm just glad it's starting to look like a lathe again.
The bed is all painted, but needs to sit a couple days for that final coat of clear to get hard. Then I'll work on getting it all shined up and see if Neil and I can lug it down to the basement.
Part of the reason for working so hard on the finish is the hope it will be easier to clean. I spent quite a while with a Scotchbright pad to clean up the surfaces on the tops of the risers and got quite a bit of dust into the chip tray. It was amazing how easily it wiped up with a bit of Fantastic, so this looks like it may work pretty well. Don't know about durability, but I'll find that out over time. I'm sure a year from now it will be scratched up quite a bit, but that's to be expected with use.
Saturday, July 25, 2009
Chip tray starting to shine
Last night I tried some sanding on the chip tray and was having problems with sanding through the paint, so I fixed those spots and shot on a few more coats of clear. This really smoothed the surface out and I was able to wet sand it to 1500 grit today just fine. I also did the rubbing compound, but was too tired to move to the polish. You can see it's starting to shine a bit.
I also clean up those bed ports that messed up and shot on some more paint. Hopefully I can finish the bed painting in the next few days. Then, I can start putting the thing back together in the basement. There will be lots of work from there. I'm going to get the bed in place, then move on to the saddle and apron, then the headstock. One thing at a time.
Friday, July 24, 2009
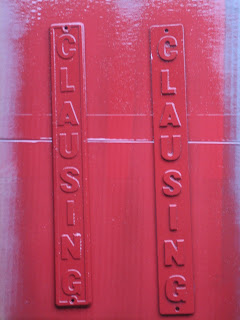
Amidst spending the day trying to get doors to open and close in a virtual world, I took some time out to work on the lathe bed and badges. Sanding with 80 grit wet sandpaper brings the Clausing name to light very well. I still need to do a bit more. The newer badge I bought was a big rough in places and needed to be sanded down to get all of the edges really crisp. I'm close, but still need to sand some more. Once I'm happy with them, I'll give them a coat of the Rustoleum Crystal Clear to protect them.
The lathe bed and risers have been painted. The risers turned out great, as did most of the bed, but the paint blistered inside each of the four ports. I have no idea why. I sanded them down and put a coat of Almond on them today and will have to wait a couple days to try again on the final coat after some more wet sanding. I think I may have tried to put the paint on a bit too thick in the ports since you end up shooting from the top and the bottom. Hardest part is trying to avoid messing up the paint I'm really happy with. You can see the towel I put in the bed to keep overspray off the top of it.
Friday, July 17, 2009
Clausing badge
These are the two Clausing labels for the headstock pedestal. The one on the right came with the lathe. The one of the left I bought on eBay for about $10. It's from a later 5914 and I think the casting is much nicer so I'm going to use it, but I decided to paint both since I may find a use for the other one somewhere. The paint is Rust-Oleum Cherry Red, which I think is a pretty close match to the red that was on the left label which I think was original. The label that came with the lathe had been painted over long ago.
I picked up a Royal 5C collet closer on eBay and it arrived yesterday. It's not exactly for this lathe, so the tube is long and it was missing what Royal calls a rear end spindle adapter, which is custom for a particular lathe model, anyway. But, as it turns out the lathe came with that particular part. It was one of those mystery parts that I could not see a purpose for before. I'll just cut the tube to length when the lathe is back running again.
Mucho painting...
UPS hath delivered and I am stocked back up on paint. I did a quick smooth sanding of the risers and the bed and shot on a couple coats of new primer and several coats of the almond. At last the bed is the right color. In a couple days I can wet sand and add another coat and the clear and maybe by next weekend be able to put the pedestals, chip tray, risers, and bed all together in the basement. It will finally start to look like a lathe again after all of this time. I won't be immediately assembling. I do need to reinstall the gear rack and the label first, but that won't take too much time.
I included 50 sheets of 320 grit sandpaper in this last order. I used to always buy sandpaper at Home Depot, but for the price of about 3 of those five sheet packages, I can order in 50 sheets and then you don't feel like you're about to run out of sandpaper all of the time. This project has really restocked my sandpaper collection. I like Enco for waterproof paper, but buy the courser paper from Auto Body Toolmart instead. The quality of the Mirka paper is so much better than any I've found elsewhere and is expecially better than the stuff you buy at Home Depot.
Wednesday, July 15, 2009
Sanded the riser
Not had a lot of time to work on the project lately, but did get to the garage tonight to do some sanding on the riser so it's ready to move on to the color paint. I'm out of paint, so I placed an Enco order tonight as well. I'm glad I procrastinated the order. I just got an email with codes for free shipping and 10% off. And, Enco is always very fast, so I expect the paint and some other misc items Friday. More pictures this weekend for sure.
Friday, July 10, 2009
Working on the risers
The risers are two cast iron pieces that go between the pedestals and the bed. The tailstock riser was one of the first pieces I worked on. The headstock riser is a bit more complicated, so I had been putting it off. But, the bed is just about ready for paint and these will be the last major item needed to put together the bed, chip pan, and pedestals in the basement. It will finally start to look like a lathe, again. The risers were a bit tough to work with, especially the one on the headstock end. Since they were rough castings, I wanted to smooth them out, but body filler would not stick very well. I did many passes of filling in the top, then having the filler flake back up. The Clausing group on Yahoo suggested that these tend to soak up oil over time and it was suggested that I hit it with a torch. I'm not that keen on hitting anything with a torch, but I did have good luck scrubbing with lacquer thinner until a paper towel did not get dirty. This seems to get the oil out so the filler sticks pretty well.
The bed is just about ready for paint. After a priming, I found a couple spots I was not happy with and spend some time tonight smoothing them out and applied more primer. After another day or so, it will be ready for a quick sanding and the final paint color.
Picked up a Royal 5C lever action collet closer on eBay for $52. I'm surprised it found it so cheap. Sent and email to Royal and they promptly sent me a manual for it as well.
Saturday, July 4, 2009
Bed getting closer
I was away from the project for a while due to work, but spent some time the past few days on the lathe bed. I sprayed a guide coat over the primer and let that sit for a day, then sanded all of it off. It's a good way to ensure the entire surface is smooth. Then I put a new coat of primer. You can see how shiny even the primer is in the ports, now. Lots of body filler and sanding and the surface is very smooth now and ready to proceed to the final paint coat.
I've picked up a Cushman 8" 4-jaw chuck and L-00 spindle protector on eBay. The Chuck is very nice; looks like it's hardly been used and I paid less than I would for a backing plate alone. I also bought a 5C collet adapter for a 5418 lathe. The main reason to buy that was to get the elusive 4 1/2MT to 5C collet adapter. I also have a thread protector that does not fit and a closer that is a bit short. I can extend the closer and found the right thread protector in another auction. What is interesting to me is that I paid less than half the price for the adapter and other items as someone else just paid for just hte adapter. eBay can be a bit nuts at time. I also bought a Clausing nameplate. I have the one the lathe came with, but this is a bit later generation and I think the casting is nicer, so I'm going to swap it in. The price wasn't very high and I was the only bidder.
Sunday, June 21, 2009
Bed is primed
I got to a coat of primer on the lathe bed today. The hardest part was smoothing the ports. The casting is actually rather rough and the ports are not always even. I used body filler to smooth them out. I ordered some Evercoat Rage Gold and found it much easier to use. I've tried several body fillers including Bondo, Napa lightweight filler, and USC Body Icing. In general, I've learned not to go to an auto parts store to buy body filler. The professional stuff is just so much better. It mixes easier and is much smoother and easier to apply. And, it sands so much easier than the other stuff I used. The USC Body Icing is probably good stuff, but I think the tube I got from Napa was very old. It should be thin, but mine was thicker than Bondo and too hard to use. I bought some Evercoat glaze to use as well. Also much better than the tube of old body icing.
Saturday, June 13, 2009
Tailstock pedestal shelves are done
I finished the tailstock pedestal shelves. They are mahogany with quite a few coats of wipe-on polyurethane. I screwed them blind from the bottom so no hardware shows. If I ever have to remove them I'll have to either lift the lathe really high or remove the pedestal. I don't know why they did not originally have a bottom shelf.
I fixed some imperfections in the chip tray finish and re-coated those places. I've found it's best to let the paint dry two whole days before over coating. I've had some problems when I repaint after only one day. So, I'll do the final paint on the chip tray on Sunday. I also worked on the risers. They have a very rough finish on them, so I'm smoothing it with body filler to get a super smooth, shiny finish. Again, I think this will make it easier to keep clean.
Wednesday, June 10, 2009
Pedestal shelves and painting progress
I have a left-over piece of mahogany and I'm using it to make the shelves in the tailstock pedestal. It originally had two particle board shelves, but they are in poor shape and pretty ugly. Once stained and finished, this will look pretty nice. I'm going to screw them in from underneath so no hardware will show rather than the headless bolts they originally used. I did put a bottom shelf in as well. Not sure why they didn't other than the problem of cutting notches for the bolts, which was pretty easy to deal with.
Aside from that, the door and the bottom of the chip tray are done. I'm flipping the chip tray today to do the top.
Thursday, June 4, 2009
More painting: door and chip tray
I've been busy with work and have not gotten as much done lately. I did get another coat of paint on the bottom of the chip tray and the tailstock pedestal door. That door has been my nemesis for some reason. It's the only place I've had problems with paint wanting to wrinkle on me, always when putting the clear coat on. I had to really sand down to remove a bad coat, so I'm giving it extra time between coats. This is hopefully the last pass of the almond. I can't get back to this until Sunday, so that gives it a few days to ensure the almond is completely dry before I try the clear again.
I'm also starting to look at assembling the pedestals. I bought new pads from Enco and I'll try to get them installed pretty soon. I also have a nice piece of mahogany left over that I plan to use for the tailstock pedestal shelves.
Sunday, May 31, 2009
Pedestals are in the basement...
Saturday, May 30, 2009
Returning to the project
I was away from the project for a week vacation, then another week to recover from the vacation, but I'm back to it now. I spent some time with body filler getting a nice fillet in the corners by the headstock. The welds there were pretty rough and I figure this looks much nicer and will be easier to keep clean. Here it is with a coat of primer on it.
I also finished the headstock pedestal and I'm about done with the tailstock pedestal. I'm still learning the best process. Here's what I'm doing now for a nice finish:
- Use body filler to smooth out any major scratches and other issues. I've also done a bit of grinding to smooth out some welds.
- Prime with the Rust-o-leum industrial primer. I'm usually doing four very light coats a few minutes apart. Wait overnight for this to dry.
- Sand the primer. This shows any issues pretty well and I can do more body filler and more sanding if needed. I've often had to repeat this process to get a smooth finish.
- Four coats of the Rust-o-leum industrial almond. Again, very light coats with a few minutes between. Let dry 24 hours.
- Wet sand the paint with 320 or 400 grit paper. I know this seems course, but I'm putting on another coat.
- Four more coats of paint. Again, dry overnight.
- Wet sand with 800 grit paper.
- Four coats of Rust-o-leum industrial crystal clear. Dry overnight.
- Wet sand with 600, 800, 1000, and 1500 grit paper. I found I had to start with a courser grit to smooth out the clear. It's pretty tough, but you have to be careful not to sand through anywhere. If you sand through, go back to almond and catch up!
- Rubbing compound, then polish.
Thursday, May 14, 2009
Painting, painting, painting, and the chip tray
I'm working my way up from the floor. The pedestals are both in the painting process. I'm painting, wet sanding, painting, wet sanding and finally will clear coat. It takes a while, but each pass looks nicer. While waiting for paint to dry I'm starting in on the chip tray. It was caked with grime when I got it, but is now down to bare metal everywhere. I'm using body filler to fillet the rough welds under the headstock so they will be easier to clean later. There's a few minor scratches I took care of and only a couple of dents. The rail is very rough so I'm using filler to smooth it out. This is before any sanding. I bent the end a bit dismantling, but have hammered that back flat already.
Saturday, May 9, 2009
Work on bed and painting the pedestals
I had a nice full day today to work on this monster. I have been spending some time on the bed. The sides and ports are roughly machined. Clausing had used some filler to smooth out the sides and the ports were left somewhat rough. I'm working on using body filler to smooth out the visible surfaces that will be painted. I figure a very smooth paint job will not only look nicer, but be easier to clean. I've little experience with body filler. I've been trying Bondo, a lightweight filler from Napa, and USC Body Icing. What appears to work is to fill with Bondo, then smooth the surface with the Body Icing. Body Icing says it is paintable, pourable, and self leveling. I don't get that at all. I can barely squeeze it from the tube and it is much thicker then regular Bondo. I wonder if I got a bad batch? It does make a very smooth finish, though and is very hard.
In case you wanted to know, the bed completely stripped weights 185 pounds, actually much less than I expected for a 1000 pound machine.
I took time out to work on the pedestals. I have both of them painted on the inside and the tailstock pedestal smoothed and primed on the outside. In case you are wondering, the paint is Rust-Oleum Industrial. The color is Almond. I've never been a big fan of gray and see no reason the lathe has to be gray again, so I choose a color I like. I love green, but that would be way to Grizzly. The Almond does suggest Jet, but I can live with that. Their machine tools may be junk, but I have a Jet band saw I've been happy with. Besides, I can paint it whatever color I want.
Tuesday, May 5, 2009
Working on the bed
Most of today was devoted to working on the lathe bed. Lots of Citristrip has finally cleaned off the grime and old paint. It's not too heavy to move around, so I'm able to turn it to work on it. I'm going to smooth out the sides and ends with body filler. I tried a lot of stuff. Bondo does not stick reliably, but a lightweight filler from Napa works okay, as does the USC Body Icing. I sanded the sides, then applied a coat and have been working on getting it smoothed out. It should give a mirror finish when I'm done.
Monday, May 4, 2009
Teardown
You may wonder about the dates. I started this blog a couple weeks after I got the lathe, so I'm catching up right now.
I've taking it all apart, which has been fun. I'm taking lots of pictures and bagging the small parts and labeling them so I hopefully can get it all back together. The inside of the headstock is very clean and in great condition. No wear on any of the gears that I can see. Compared to my Chinese 9x20, this sucker is built! Everything is larger and well design and fits like a glove.
It's been fascinating to take something that weights more than half a ton and reduce it to parts that I can carry around myself! Well, maybe not the bed, but I can lift one side of it no problem, so it can't weigh that much. I'm going to stick a scale under it soon just to get an idea what it does weigh.
Grime
The grime is positively incredible. It's up to 1/4" thick in places and is a hard, congealed mess loaded with sharp swarf. It doesn't even scrape off. I took some parts and pressure washed them and some of it comes off, but some is like varnish. But, Citristrip seems to work wonders on it and the multiple layers of paint as well.
You can see the slave cylinder for the variable speed drive. There's parts missing so it would be very hard to recover it from dead and I don't plan to.
A benefit of the grime is that I think it really protected the machine. As I get under the garbage, the machine looks very nice. The ways are in great shape and nothing is damaged or broken that I've found. I am going to completely restore it including a complete teardown, strip, and repaint.
Getting it home
I rented a Uhaul trailer and drove to Elkhart, Indiana (about two hours) to pick the lathe up. I got it very cheaply from a dealer who was going to part it out. The variable speed drive is dead, but I'm planning on putting in a variable frequency drive, anyway, so I'll just drop the entire system. I'm still not sure about losing the clutch and brake though.
It was incredibly filthy when I got it. The grime was so thick in places that I could not even pressure wash it off. Most everything is here. The threading chart is gone and I need some minor parts here and there. Getting it off the trailer was an experience. I've never tried to move 1000 pounds around like this before. I bought the requisite engine hoist, but it would not reach far enough to get to the center of gravity of the lathe. I had to push it to the end and then lift it over the tailgate. Next time I'll know to push it onto the tailgate and then just lift it off, but had to start somewhere, right?
Selecting a lathe
I've always wanted to try metalworking, so I did what so many people have done before: I bought a minimill and a 9x20 lathe from Harbor Freight. I have mixed feelings about these machines. On the one hand they are very cheap and can do good work. On the other hand, they are really poorly made and I mean REALLY POORLY MADE. They are just this side of junk. So, I decided I wanted something more substantial. I've not found a good choice for a milling machine (I can't get a Bridgeport to my basement), but there are lots of great American-made lathes around. After looking around, I found myself most attracted to the Clausing 4900 and 5900 series lathes. I almost bought a 4900 locally. Then I found a 5914 in Elkhart, Indiana which I bought and have launched into restoring. I'll try to write about some of my experiences as I go along. The picture is the one I was sent of the machine from the used equipment dealer. Yep, it's filthy, but it's a solid machine.
Subscribe to:
Posts (Atom)